Enhance Campus Navigation with Indoor Route Networks
- Steve Bowley
- Jan 9
- 4 min read
Updated: Jun 20
Are you looking to create a seamless navigation experience for your campus? Indoor route networks are transforming the way people find their way around, offering on-the-fly route calculations and turn-by-turn directions between interior spaces.
These networks include everything needed to ensure accurate and accessible navigation: floor transitions, stairways, escalators, elevators, ramps, and also wheelchair-accessible routes. Whether your users are looking for a specific building entrance, a classroom, an office, or even an interior landmark, indoor routing makes it simple to locate and navigate to any space or feature on your campus.
By leveraging indoor route networks, you’re not just improving convenience—you’re enhancing accessibility, reducing frustration, and empowering your campus community with the tools they need to explore and navigate confidently.
Unlocking the Potential of Indoor Route Networks: Use Cases
Indoor route networks can improve campus navigation in a variety of ways. Here are some practical use cases where they can make an impact:

Visitor Navigation: Help campus visitors effortlessly find their way to offices, classrooms, labs, or other facilities.
Maintenance Support: Guide maintenance personnel directly to the specific room or location of maintainable assets, saving time and effort.
Parting to Destination: Provide clear directions from parking spaces to designated rooms or spaces for a smoother arrival experience.
ADA-Accessible Routing: Highlight and display wheelchair-suitable and ADA-compliant routes between facilities to support inclusivity.
Travel Time Analysis: Offer insights into the time it takes to travel between spaces, such as from dorms to classrooms or offices.
Proximity Searches: Enable users to quickly find the nearest amenities, such as parking spaces, restrooms, or dining facilities, from their current location.
Creating an indoor route network in Esri ArcGIS Pro involves setting up a network dataset within an ArcGIS Indoors geodatabase, and publishing it to ArcGIS Server as a hosted route analysis service. Here’s a high-level overview of the steps required to complete the process:
1. Prerequisites
ArcGIS Pro: ArcGIS Pro version 3.0 or later with the Network Analyst and 3D Analyst extensions.
ArcGIS Indoors license: ArcGIS Indoors Pro or Indoors Maps license enabled
ArcGIS Server: Network datasets require ArcGIS Server for hosting, typically managed within ArcGIS Enterprise (Portal for ArcGIS). ArcGIS Online does not currently support the hosting of network analysis datasets.
Prepared Indoor Database: Indoor GIS data for building levels, facilities, and units (rooms/spaces) developed in accordance with the ArcGIS Indoors Information Model (AIIM) data schema.
2. Data Schama
The ArcGIS Indoors Information Model (AIIM) is used as the underlying data schema for generating indoor route networks. This data model ensures logical relationships between rooms, pathways, building levels, and building footprints.
Indoor Floor Plan data layers:
Sites: Polygon features that represent the area extent of the campus or installation.
Facilities: Polygon features that represent individual buildings or structures.
Levels: Polygon features that represent floors within a building.
Units: Polygon features that represent individual rooms or spaces on each level.
Details: Polyline features that represent architectural details of the building, such as interior and exterior walls, windows, partitions, sanitary equipment, doorways, and stairs.
3. Create the Indoor Route Network
The indoor route network is created over a series of sequential steps using tools in the ArcGIS Indoors toolbox and Network Analyst toolbox.
Step 1: Prepare the Network Dataset
Pathways Feature Class: All possible network edges (lines) along which people can travel inside the building.
Transitions: Vertical connectors (lines) representing stairs, elevators, and escalators between floors.
Tools:
Use the Indoors Network toolbox to generate indoor pathways and floor transitions
Ensure transitions are connected (snapped) to indoor pathways, and indoor pathways are connected to external pathways.
Use a 3D view to reshape transition lines to represent stairway landings by inserting vertices and adjusting elevation (Z) values of transition vertices.
Thin the indoor pathways layer to remove preliminary network pathways that are not essential for routing between selected locations on each level, reducing the network dataset size and improving its route-solving performance.
Step 2: Define Network Attributes
Travel Mode: Define specific travel modes (walking, wheelchair accessibility, etc.) within the network dataset.
Impedance Attributes: Define impedance values (travel time, distance, and avoidances).
Step 3: Create a Network Dataset
Use the Create Network Dataset tool to define the network structure using the Thinned Pathways and Transitions layers.

Step 4: Build the Network Dataset
Once the network dataset is configured, it must be built to make it usable for routing.
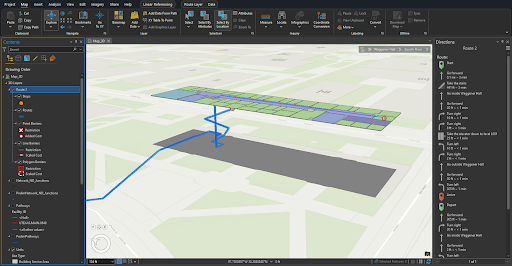
Create a route analysis layer from the network dataset
Step 5: Test the Route Network
Perform tests using the Network Analyst toolbar to ensure proper routing between rooms, levels, and buildings.
Test the route network in ArcGIS Pro before publishing
Step 6: Publish the Routing Service
Publish the route analysis layer as a hosted feature service to ArcGIS Server. This allows users to perform network analysis (such as route calculation) via web or mobile applications.
Step 7: Create Web Maps and Web Scenes
Create and publish 2D web maps and 3D web scenes with your building data to display calculated routes in web and mobile applications.
Step 8: Create Web Applications
Create customized web-applications from configurable app templates such as the Esri Indoor Viewer template, which references the route analysis service to provide on-the-fly route calculation and directions.
ArcGIS Indoor Viewer Application with indoor routing


ArcGIS Indoors Mobile App with Indoor Routing
Data shown courtesy of the University of Texas at Austin.
4. Additional Considerations
Accessibility: Ensure pathways and connectors are configured to allow for accessible routes for individuals requiring the use of a wheelchair and mobility impairments.
Navigation Rules: Configure rules to prevent routing through restricted areas or ensure proper behavior at intersections and transitions between floors.
Connectivity: Ensure all pathways and vertical connectors are properly snapped at doorways and points of intersection to allow for uninterrupted routing.
By following these steps you can generate and publish indoor route networks for any building and campus, providing on-demand navigation between your campus facilities, spaces, and assets.


